This post contains affiliate links. If you shop using these links I make a small commission, but you are never charged any extra! And as always, my opinions are completely my own.
Most of us are still at home. I thought we would look at sweet treats this time. We all need something sweet to get us through this difficult time.
Subscribe to my free newsletter and download pdf copies of Boredom Buster Activities.
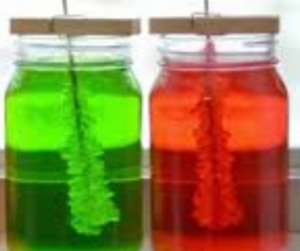
Rock Candy
This one will require help from an adult if you are not allowed to use the stove by yourself.
Material:
- 2 cups of water, purified is best
- 4 cups of granulated white sugar
- Tall Glass Bottles
- String – natural fiber, like twine or cotton
- Food coloring (optional)
- Flavoring (optional) – extracts, juice, kool-aid
Steps:
- Heat 2 cups of water in a pot, bringing it to a boil.
- Stir in the 4 cups of sugar, 1/2 cup at a time. Stir with a spoon after each addition until the sugar is dissolved. If the sugar stops dissolving, turn the heat up so the water reaches a vigorous boil and keep adding sugar.
- Remove the solution from the heat and allow it to cool for 15-20 minutes. If you have undissolved sugar pour the solution through a strainer.
- Add food coloring and/or flavoring if you don’t want plain rock candy. Make sure you stir the solution thoroughly so the flavor and color are evenly distributed.
- Pour the solution into a tall, cylindrical, glass container where you plan to grow your rock candy crystals. Fill the glass almost to the top.
- Tie one end of a string around the middle of a pencil and tie a weight like a paperclip or a washer to the other end. The weight will keep your string hanging straight. The string should be about 2/3 as long as the glass is deep.
- Dip the string in the glass of sugar/water solution, remove it, and lay it straight on a piece of wax paper to dry.
- Make sure the string is completely dry and lower the string in the glass of the sugar-water, resting the pencil on the top of the glass.
- Cover the solution with a paper towel and place the glass in a cool, dark place, where it will remain undisturbed.
- Wait one week for crystals to form. Don’t touch or tap the glass. After a week you should see big, smooth crystals on the string
- Carefully remove the string from the solution and lay it on wax paper to dry. Snip the paperclip off with scissors.
Notes:
- This recipe makes one candy. If you want to make multiple small candies you can divide the solution into smaller jars.
- Tape the pencil to the jar to keep it from rolling or moving while your crystals form.
- The string should hang straight down and never come in contact with the bottom or sides of the glass.
- If the rock candy is stuck to the glass, run some hot water on the bottom of the glass.
- If you want to grow crystals quickly, but don’t care if they get big, put the glass in a sunny spot so that the water evaporates quickly.
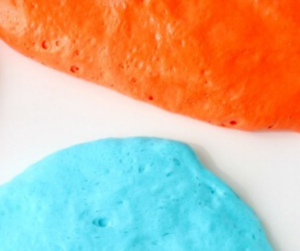
No-Cook Marshmallow Slime
This is a great way to play at home, Sticky, gooey, and edible, your little nerds will love this slime. I had to go with Broncos’ colors for this one.
Material:
- A container of Marshmallow Fluff
- Powdered Sugar
- Food Coloring
- Cooking Oil
- Flavoring (optional) – extracts, oils, kool-aid
Steps:
- Mix the food coloring and flavoring(just a little) into the fluff.
- Pour one cup of powdered sugar onto a clean surface and spoon the marshmallow fluff on top.
- Coat your hands with cooking oil for easier kneading.
- Knead the powdered sugar into the mixture until you achieve your desired consistency.
Notes:
- This slime recipe won’t last long. Make sure to store it in a covered container, and it should be good for the next day, although the texture may have changed some.
- While this is edible, it is A LOT of sugar.
Subscribe to my free newsletter and download pdf copies of Boredom Buster Activities.
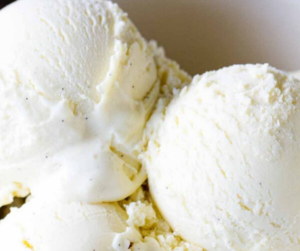
Ice Cream in a Bag
With the weather heating up, it’s time for Ice Cream. This makes one serving and you can make it at home.
Material:
- 1 tablespoon sugar
- ½ cup whipping cream
- ¼ teaspoon vanilla
- 6 tablespoons rock salt OR 6 tablespoons kosher salt
- 2 pint-size ziplock bag
- 2 gallon-size ziplock bag
- a bunch of ice
Steps:
- Fill one of the pint-size bags with the cream, vanilla, and sugar, then seal it.
- Using the other pint-size bag, double bag the first bag to prevent any leaks.
- Place enough ice in one of the gallon bags until it is half full. Then add the salt.
- Using the other gallon-sized bag, double bag the bag with the salt and ice in it.
- Place the doubled pint-size bag inside the gallon bag with ice and salt. Make sure that both the bags are still sealed.
- Shake the bags for about 15 minutes, until you see ice cream taking shape in the small bag.
- Take out the small bag with the vanilla, sugar, and cream. Enjoy!
Notes:
- To stop your hands from freezing you can use a potholder or cover the bag with a towel.
- You can eat this right away or pop it into the freezer for later.
- Try adding flavors like chocolate or caramel to the cream and sugar mixture.
Subscribe to my free newsletter and download pdf copies of Boredom Buster Activities.
With nerds at home and practically attached to their phones, it is important to sanitize their phones. There are 25,127 bacteria per square inch on a cell phone. Be sure to check out my post on Cleaning Your Nerd’s Phone.
Looking for online activities to keep your nerd occupied at home? Check out my list of Free Online Summer Camps. Most of them are available year-round.